How To Create Menu In Android Studio
Steps to create a Android Menu
![]()
This tutorial will teach you how to implement an options menu in any of your Android SDK applications.
In Android apps, you can make use of three standard menus supported within the platform: the context menu, the options menu, and submenus.This is a common feature in almost all apps, so your users will be used to the menu appearing in this way
To implement an options menu for an Activity in an Android app, a few fairly straightforward steps are required.
Step 1: Open an Activity Class
Select your applica t ion package and choose "File", "New", then "Class" and enter a name of your choice. Remember to make your class extend the Activity class and add it to the application Manifest.
Step 2: Create a Resources Folder
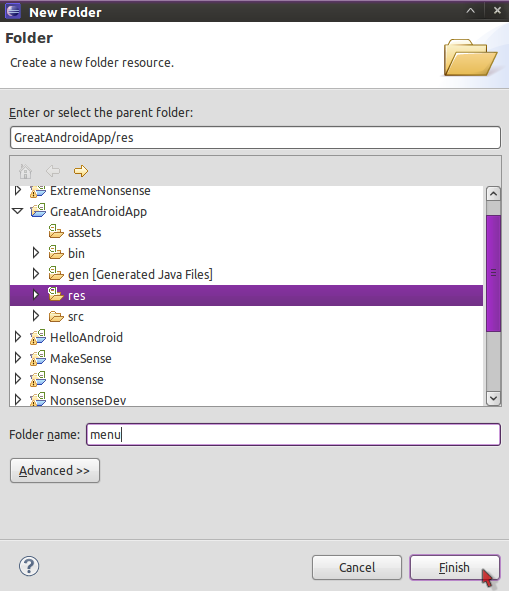
The "res" folder holds all of your application resources. To create a menu, you need a menu folder, so create one inside the "res" folder by selecting it and choosing "File", "New", then "Folder" and entering "menu" as the name.

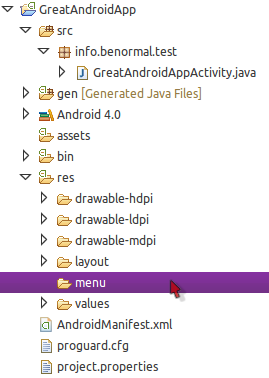
Your new folder will appear within the "res" directory:

Step 3: Create a Menu XML File
Choose the folder and create a new file by selecting "File", "New", then "File" and entering a name.You can choose any filename you like, for example "my_options_menu.xml".
<menu xmlns:android="http://schemas.android.com/apk/res/android">
</menu>
Step 4: Add Items to Your Menu
You can add one or more items to your options menu depending on the needs of your own project. Add an item for each menu option using the following syntax:
<item android:id="@+id/about"
android:title="About" />
<item android:id="@+id/help"
android:title="Help" />
Step 5: Create Icons for Your Menu Items
Once you have your icons in their folders, you can alter your menu item XML to include them as follows:
<item android:id="@+id/about"
android:icon="@drawable/about"
android:title="About" />
<item android:id="@+id/help"
android:icon="@drawable/help"
android:title="Help" />
Step 6: Inflate Your Menu Resource
Add the following method to your Java code, inside the class declaration and after the "onCreate" method:
public boolean onCreateOptionsMenu(Menu menu) {
MenuInflater inflater = getMenuInflater();
inflater.inflate(R.menu.my_options_menu, menu);
return true;
}

Step 7: Detect User Interaction
Add the following method outline after the "onCreateOptionsMenu" method:
public boolean onOptionsItemSelected(MenuItem item) {
//respond to menu item selection
}
Step 8: Respond to Menu Item Selection
Add a switch statement to your method using the following sample syntax:
switch (item.getItemId()) {
case R.id.about:
startActivity(new Intent(this, About.class));
return true;
case R.id.help:
startActivity(new Intent(this, Help.class));
return true;
default:
return super.onOptionsItemSelected(item);
}

Download Free PDF for Android Development Topics
Conclusion
Eclipse typically adds the import statements automatically as you enter your Java code.
As with any development project, your apps will be more usable if they exploit the type of interaction and functionality users expect as standard. Using the options menu is a good way to achieve this when providing informative sections.
Check out these — How to create android menu with simple Example
How To Create Menu In Android Studio
Source: https://medium.com/@saranyaan2710/steps-to-create-a-android-menu-bbb17edd07af
Posted by: andersonbarives.blogspot.com

0 Response to "How To Create Menu In Android Studio"
Post a Comment