How To Create An Email Template With Attachments In Outlook
 Working with message templates can be a great way to save some time composing emails or answering repeated requests. Outlook offers several methods to work with message templates to be more productive in any situation.
This guide discusses the various methods and offers some tips to get you started with.
- Quick Steps
- Quick Parts / AutoText
- My Templates Office Web Add-in
- Insert as Text
- Drafts
- Oft-files
- Rules
- AutoCorrect
- Signatures
- Stationery
- Custom forms
- Add-Ins
Quick Steps
 Quick Steps allows you to define your own commands which performs one or multiple actions. One of these actions is to create a new email message, reply to a message or forward a message and predefine various fields such as the To and Subject line but also the message body.
How to create?
To create a new Quick Step, you can click on the "Create New" link within the Quick Steps gallery on the Home tab. To create a new template message, choose one of the following actions from the list;
- New Message
- Forward
- Reply
- Reply All
- Reply With Meeting
- Forward message as an attachment
By default, you'll only see the "To…" line, but when you click on the Show Options link, you can specify one or more of the following fields;
- To
- CC
- BCC
- Subject
- Follow Up Flag
- Importance
- Message Text
- Automatically send after 1 minute delay.
How to use my template?
Once you've created your Quick Step, it will automatically show in the Quick Steps gallery on the Home tab of the Ribbon. Just click on it to execute it.
When you want to change the template, actions, name or display icon, simply right click on the Quick Step and choose: Edit <your Quick Step name>.
Where is it stored?
Quick Steps are stored within your mailbox. When you use an Exchange or Outlook.com account, your Quick Steps will be available to you on all computers on which you have added your account to Outlook.
For backup instructions see; Backing up and Restoring Quick Steps

Overview of a Quick Step configured to reply to the currently selected message with boilerplate text and to mark the message as read. The keyboard shortcut has been set to CTRL+SHIFT+1.
Quick Parts / AutoText
 Quick Parts is the main feature to create and insert blocks of text. It is the successor of what used to be AutoText in Outlook 2003 and previous.
How to create?
When you start a new message you'll find the Quick Parts command under;
- Simplified Ribbon (Microsoft 365)
Insert-> ellipsis (…) button on the right-> Quick Parts - Classic Ribbon
Insert-> Quick Parts
To create one of your own, simply type your standard text in an email first. After this, select your text and press ALT+F3 or choose;
- Insert tab-> Quick Parts-> Save Selections to Quick Part Gallery…
Quick Parts also support formatting such as color, fonts, etc… and fields (Insert-> Fields…). This will allow you for instance to create templates which holds a reference to and highlights the current date or to mention a date which is x days into the future (e.g. to notify that the issue will be closed after that date when no reply is received) without the need to update this field manually.
To update a Quick Part later, you'll have to insert it in a message first. Then make your changes to the Quick Part and save it with the same name.
How to use my templates?
To insert a Quick Part, you select the Insert tab and click on the Quick Parts button. This will open a gallery with previews of Quick Parts to choose from.
Sadly the implementation of Quick Parts in Outlook isn't as complete as the implementation is for Word as it is not possible to assign keyboard shortcuts to a specific Quick Part. This takes some "quickness" away. To at least save you a click for selecting the Insert tab first, you can add the Quick Parts Gallery to the Quick Access Toolbar (QAT) by right clicking it and choose Add to Quick Access Toolbar.
Another method to insert a Quick Part is to type its name (or at least the part until it gets unique when compared to the names of your other Quick Parts) and press F3. In Outlook 2016 and later, you'll also get a pop-up suggestion and then you can press ENTER to insert it.

The Insert Quick Part suggestion feature.
To gain access to the Building Blocks Organizer, you'll have to add it to the QAT as well or right click any Quick Part from the list and choose "Organize and Delete…". This last option only works when the message format is set to HTML and not when it is set to Plain Text. For more details see this post.
Where is it stored?
Quick Part entries are stored in the NormalEmail.dotm file.
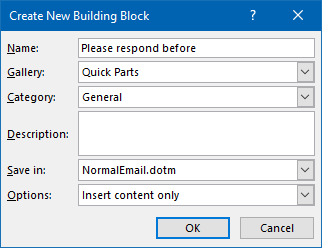
Enough organizing options to sort and find back your Quick Parts later.
My Templates Office Web-Add-in
 The My Templates Office Web Add-in is available when you are using Outlook 2013, 2016, 2019 or Microsoft 365 with an Exchange 2013, 2016, 2019 or Exchange Online (Microsoft 365 for Business/Enterprise) or Outlook.com account.
It lets you create templates that include text and images. Templates that you create with My Templates are not just available in Outlook but also in Outlook on the Web (OWA).
How to create?
Before creating your first template, you must first enable the Web Add-in. To do this, select the Get Add-Ins or Office Add-Ins command on the Home tab of the Ribbon. This will open a dialog from which you can enable and add the My Templates add-in.
When composing a message, you can open the My Templates pane in the following way;
- Simplified Ribbon (Microsoft 365)
Home-> ellipsis (…) button on the right-> View Templates - Classic Ribbon
Home-> View Templates
This will open the My Templates pane on the right of the message where you can define templates of your own. You can paste copied images into these templates as well.
How to use my templates?
Once you have the My Templates pane opened in Outlook, you can simply click on any template to quickly insert it.
In Outlook on the Web and Outlook.com, you can find the My Templates button in the bottom right corner below your Message Compose section but you may need to press the ellipsis (…) button to actually see it.
Where is is stored?
Your templates are stored within your mailbox so they are also available to you when you are using another computer or Outlook on the Web.
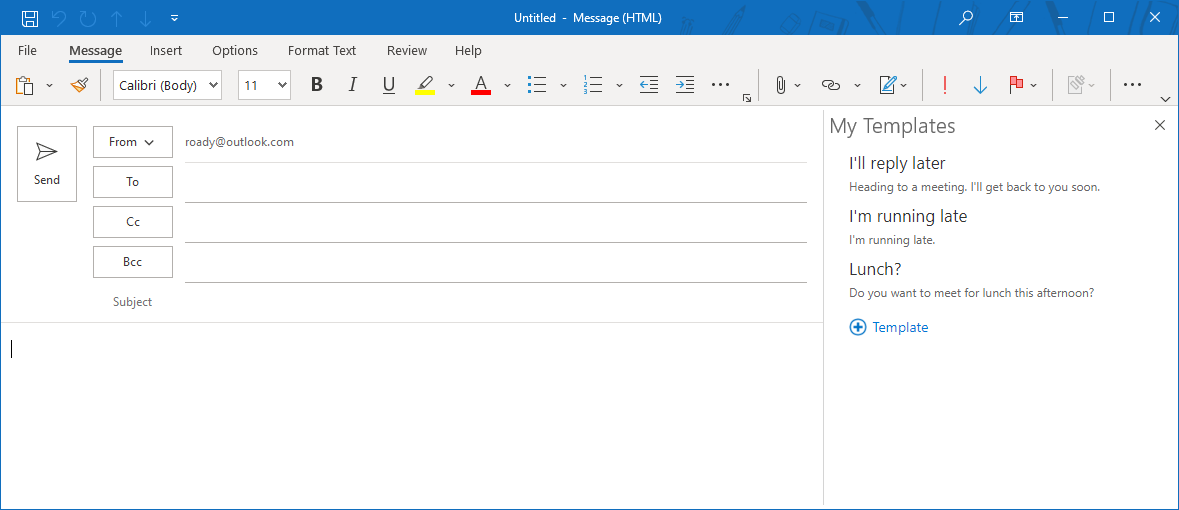
The My Templates Office Web Add-in is only available when you are using an Exchange account.
Insert as Text
 Insert as Text is an option which will allow you to directly insert the contents from another text based document into an email without needing to open that document first and copy and paste the text manually from the document into the email.
How to create?
As this is file based, all you have to do is create a file with the contents of your template. Quite a few text based document formats are supported such as txt, htm, html, rtf, doc and docx. This will allow you to also contain formatting such as color, fonts, etc… in your templates. Because of the HTML support it will also allow you to inject HTML directly into the message body which can be handy for newsletter templates for example.
How to use my templates?
This feature works almost the same as inserting an attachment;
Click on the paperclip icon while composing a message and browse to a text based document. Instead of directly clicking on the Insert button, click on the little down arrow on the Insert button and choose Insert as Text.
In Outlook 2016, Outlook 2019 and Microsoft 365, this option has been hidden but can be made available again by adding the classic Attach File command to your Quick Access Toolbar (QAT) or Ribbon.
As the Insert as Text option is based on attaching a file, by default it will open to your Documents folder. To quickly jump to the location where you store your templates, you can add the location to your File Explorer Favorites or Office Favorites.
Where is it stored?
You can store the files anywhere you like. For instance, if you keep your documents on the D:\ drive you could locate them in a logical sub folder such as;
D:\Documents\Outlook\Templates
The Insert as Text option is a great solution if you need to share your blocks of texts. The text-files can be stored on a network share (and additionally sorted in sub folders) so they can be accessible by everyone in your team and updates to them will reflect to everyone else this way.

Directly inject some text or HTML code into your message via Insert as Text
Drafts
 Drafts are unsent Outlook messages that are saved inside of Outlook.
How to create?
When basically the entire message is part of your message template, then creating a draft message that you can reuse is a good way to go. You compose the message once in Outlook and then press the Save button so it will be stored in your default Drafts folder in Outlook.
You can also predefine the subject, or any of the Address Fields. If you have multiple accounts configured, you can even predefine the sending account as well without the need for any programming.
How to use my templates?
When opening a draft from within Outlook, Outlook considers it to be a continuation of the original message. This means that the message will be removed from your Drafts folder after sending it. Therefore, you should either press the Forward button after selecting a draft or make a copy of the draft first before opening it. For more techniques, also see; Keep a copy of a Draft as a message template.
Where is it stored?
By default, drafts are stored in your Drafts folder. You can of course choose to create a separate Templates folder within Outlook where you can store your template drafts. If you have many, you could even organize them into subfolders or assign them categories.
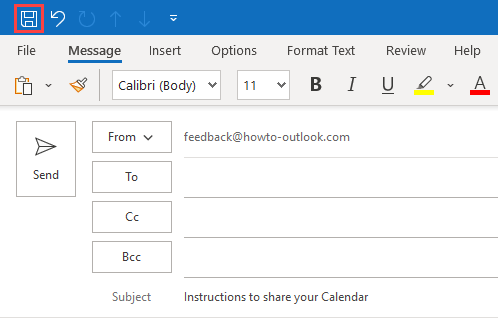
Saving a Draft message as a Template inside the Drafts folder of your mailbox.
Oft-files
 Oft-files are unsent Outlook messages that are saved outside of Outlook.
How to create?
Similar to creating a Draft template, when basically the entire message is part of your message template, then creating an oft-files is a good way to go. You compose the message once in Outlook and then use the Save As… function to save it outside of Outlook as an oft-file.
You can also predefine the subject, or any of the Address Fields. If you have multiple accounts configured, you can even predefine the sending account as well without the need for any programming.
How to use my templates?
Oft-files can easily be opened by double clicking it from the location where you stored it. For easy access to the template you can also create a shortcut to it in the Shortcuts Navigation or pin it to Outlook's Jump List.
Where is it stored?
For oft-files it is basically the same story as where you can save the Insert as Text templates; You can save them anywhere you'd like. However, when selecting *.oft as the Save As type, Outlook will default to your Templates folder.

Saving a Draft message as an Outlook Template (oft-file) outside of Outlook.
Rules
 Rules are designed to automate applying actions to messages upon arrival. As they can also be run manually and reply to messages, it can also be used to reply to messages in bulk.
How to create?
The rule that you'll need to create for this method will require the following criteria;
- reply using a specific template (when not using Exchange or when the message template is stored locally)
- have server reply using a specific template (available only when using an Exchange server)
You can of course set additional actions and criteria but it is not needed for this method. Make sure that after creating the rule, you disable it.
If you always want to reply directly to that message automatically then you'll have to set some additional exceptions to prevent an endless mail loop. An example for such a rule can be found here.
How to use my templates?
It is best to first collect the messages that you want to reply to in bulk in a single folder (this can be done automatically via a separate rule). This will allow you to use the rule more easily. For instance, a lot of people emailed you with feedback and you want to thank them all at once and want to inform them about the main feedback that you got and what you are going to do with it.
You can now manually execute this rule against the selected folder to send the standard message to all the people who have replied to you with feedback;
- Open the Rules and Alerts dialog;
- tab Home-> button Rules-> Manage Rules and Alerts…
- Press the button "Run Rules Now".
- Select the created template rule and make sure all other rules are disabled.
- Use the Browse… button to set the folder to the folder where you stored all the feedback messages in.
- Press the button Run Now.
Where is it stored?
The rule itself is stored within your mailbox.
When you created the rule with "have server reply with a specific template" then the template is also stored in your mailbox as a hidden message.
When you created the rule with "reply using a specific template" then the template is an oft-file which you are free to place anywhere that is most convenient to you.
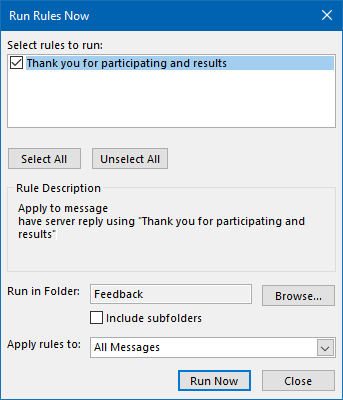
Reply to all messages in a single folder at once.
AutoCorrect
 While AutoCorrect is not directly designed to insert template text, it does allow you to quickly insert template text via a specific keyword or acronym.
How to create?
Just like creating an AutoText or a Quick Part entry, you start with typing your template text first within a message. This may even contain formatting. After you have finished typing, select your text and open the AutoCorrect dialog;
- File-> section Options-> section Mail-> button Spelling and AutoCorrect…-> section Proofing-> button AutoCorrect Options…
Your template text will automatically be copied into the replacement text field.
Type your keyword and make sure you select the "Formatted text" option to maintain formatting and/or to support entries larger than 256 characters.
How to use my templates?
Using the templates is as easy as typing your keyword that you configured in AutoCorrect options. As soon as you hit the Spacebar or Enter key after inserting your keyword, AutoCorrect will automatically replace it with your template text.
Where is it stored?
Formatted AutoCorrect entries are stored within your NormalEmail.dotm file.
Non formatted AutoCorrect entries are stored within a file called MSO####.acl where #### is replaced with the language ID number for the file.

Save your AutoCorrect templates with formatting if needed.
Signatures
 Signatures are designed to insert a predefined text block at the end of your email. In some cases these can also be used to insert text templates.
In general it is not recommended to use signatures to insert text templates unless they really are signatures. This is because you are not actually inserting a signature but you are actually switching the signature; when you select a different signature while composing, the default signature is removed and replaced by the one that you have selected.
How to create?
Signatures can be created via;
- File-> section Options-> section-> Mail-> button Signatures…
For more about creating signatures see this more specific Signatures guide.
How to use my templates?
To select/add your signature use;
- From the Include section of the Message tab press the Signature button to see your defined signatures.
- When you select a signature when one is already added to your email, the signature will be swapped and not included as a second signature.
Where is it stored?
Signatures are stored in 3 file formats (.txt, .htm and .rtf) in the Signatures folder. For easy access to this folder, hold the CTRL (Control) button on your keyboard while pressing the Signatures… button in the Options dialog mentioned above. This will directly open the folder in Explorer.
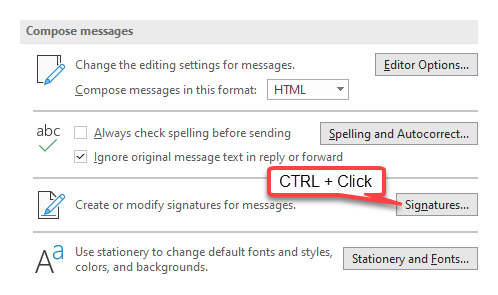
By clicking the Signatures button, you can create new and manage your current Signatures. By holding the CTRL button while clicking the Signatures button opens the Signatures folder in File Explorer.
Stationery
 The stationery feature of Outlook is used to determine your design when composing a new email.
How to create?
Stationery files are HTML based. Instead of only defining a layout, a background and a header in your HTML template, you can also decide to only include text. When you now would use that Stationery, that text is automatically loaded into your message body.
How to use my templates?
Stationery files first need to be stored in your Stationery folder (see below). Once you've done that, you can select them in the following way;
- Simplified Ribbon (Microsoft 365)
Home-> down arrow on New Email button-> E-mail Message Using-> More Stationery… - Classic Ribbon
Home-> New Items-> E-mail Message Using-> More Stationery…
Where is it stored?
Stationery is stored in htm format in your Stationery folder;
C:\Users\%username%\AppData\Roaming\Microsoft\Stationery
For easy access to this folder, hold the CTRL (Control) button on your keyboard while pressing the Stationery and Fonts… button in the Options dialog mentioned below. This will directly open the Stationery folder in Explorer;
- File-> Options-> Mail-> button: Stationery and Fonts…

Start a new message based on Stationery with default text.
Custom Forms
 A "form" is basically the design and the function of the fields when you open or create a new Outlook items such as a message, appointment or contact. You can design these yourself as well.
How to create?
You can design these layouts yourself as well via the Form Editor in Outlook. Using them is a bit more complicated as the other methods mentioned in this guide as it (often) requires additional programming but it if you get passed that it can be one of the most powerful solutions as well.
To start the design of a new message template you can use;
- Enable the Developer tab
File-> Options-> Customize Ribbon-> in the right pane, enable the selection field before "Developer"-> press OK to return to Outlook. - Once enabled, select the Developer tab and choose: Design a Form

The Developer tab needs to be enabled first.
If you are interested in designing and programming your own forms the following links will get you started. Some are a bit outdated but so is the Custom Forms feature so most of it will still apply.
- Create an Outlook Form
- Publish a Form
- Developing Custom Forms Using Microsoft Outlook 2002 (Part 1 of 2)
- Developing Custom Forms Using Microsoft Outlook 2002 (Part 2 of 2)
- Using contact item selector fields
- Changes to custom properties in Outlook
Microsoft used to offer a whole list of custom forms which you could use directly or customize into your own solution. As these are very old (most were created in the Outlook 97/98 period), some of them still work as they were intended way back then though. Some good forms to get you started are the While you were out form and Vacation Request form.
How to use my templates?
Selecting a custom form can be done via;
- Simplified Ribbon (Microsoft 365)
Home-> down arrow on New Email button-> More Items-> Choose Form… - Classic Ribbon
Home-> New Items-> More Items-> Choose Form…
Where is it stored?
Custom forms can be saved as oft-files via the Save As… option and then you are free to choose a location which is most convenient to you. The location defaults to your Templates folder.
Custom forms can also be published within a specific folder in Outlook or to the Organizational Forms Library. In that case they are stored as a hidden message within your mailbox or the Public Folder. When your form contains code, they must be published instead of saved as an oft-file for the code to run.
- While designing your form-> Developer tab-> button Publish-> Publish Form As…
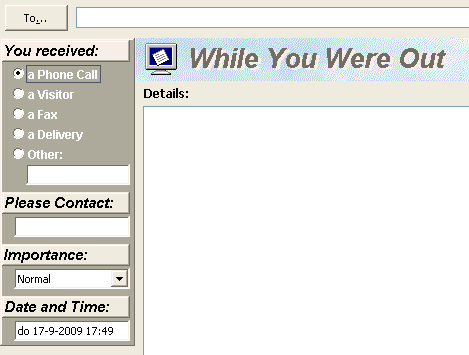
The While You Were Out form might be old but is still useful.
Add-ins
 Below is a list of 3rd party template tools which you can use in addition to the existing template features or as a replacement of it. I won't discuss their start to finish processes but will highlight their unique features.
Quick Templates by MAPILab
- Quickly insert a specific template via a pre-defined Hotkey (up to 26).
- Supports font formatting.
- Generate templates from text selections.
- Easily accessible on the main Message tab in the Ribbon.
- Discount code 4PM76A8
Quick Text Hotkeys by Sperry Software
- Quickly insert a specific template via a pre-defined Hotkey (not just via letters but also via the function keys and with combinations of CTRL, SHIFT and/or ALT).
- Support for date and time variables in different display formats.
- Also can be used when creating contacts, appointments, tasks, notes and journal items.
- Easily backup and restore your created templates to share your templates or to restore them after a reformat or installation on a new computer.
- Discount code BH93RF24
Email Templates by Agave Software Inc
- Special button to directly initiate a reply with specific template text.
- Support for variables to resolve properties of the message you are replying to or from your contact information.
- Support for prompts to quickly insert some unique values into the template text.
For instance, include a username and password in an introduction email without needing to look up their insertion points within the email. - Supports public and private templates which can be stored in your own mailbox or Public Folders.
- Discount code: RSPA-WKGG
Bells & Whistles for Outlook by DS Development
- Full formatting support for templates, including images.
- Categorize your templates and/or quickly insert a specific template via a pre-defined Hotkey (up to 21).
- A template can also automatically readdress (add or remove recipients) the emails or change the subject.
- Automatically insert a greeting when replying to messages (also supports retrieving information from contact information such as nicknames).
- Include or quote the names of the original attachments.
- Many more additional features such as adding notes to messages, automatically zip outgoing attachments, empty subject alert, forgotten attachment alert, reply to all alert, always reply in Plain Text or HTML, automatically mail merge when addressing mails via the Bcc field and still even more…
For more templates add-ins see the Templates section of our add-in database.
How To Create An Email Template With Attachments In Outlook
Source: https://www.howto-outlook.com/howto/messagetemplates.htm
Posted by: andersonbarives.blogspot.com

0 Response to "How To Create An Email Template With Attachments In Outlook"
Post a Comment